:: Elektronika MK :: Nokia 92xx Archive :: Kannel for Windows ::
-- Переключиться на Русский --
News №13
Nokia DCT1-2: bypassing protection
Chapters:Theory
All Nokia GSM phones have been divided into generations since the very beginning of production.
There are several: DCT1, DCT2, DCT3, DCTL, DCT4, DCT4+, BB5.
The abbreviation DCT stands for Digital Core Technology, and BB in the latest generation stands for Base Band.
In this article, we are only interested in models from the DCT1 and DCT2 generations, i.e., the earliest GSM handsets from the Finnish brand.
Here is a list of them:
| DCT1 | DCT2 | |
|---|---|---|
| Nokia 1011 [NHE-2] Nokia 1610 [NHE-5(NX)] Nokia 1611 [NHE-5(SX)] Nokia 1620 [NHK-5(NX)] Nokia 1620 [NHK-5(NY)] Nokia 1630 [NHK-5(NA)] Nokia 1630 [NHK-5(NX)] Nokia 1631 [NHE-5(SA)] Nokia 2010 [NHE-3(DN)] Nokia 2040 [NHK-3] Nokia 2110 [NHE-1(NX)] Nokia 2110i [NHE-4(NX)] Nokia 2114 [NHE-4(NC)] Nokia 2118 [NHE-4(NY)] Nokia 2120 [NHC-1(X)] |
Nokia 2120 Plus [NHC-4(NX)] Nokia 2140 [NHK-1(XA)] Nokia 2148 [NHK-1] Nokia 2148i [NHE-4] Nokia 2148i [NHE-4(AX)] Nokia 2160 [NHC-4(NE)] Nokia 2160i [NHC-4(HE)] Nokia 2170 [NHP-4] Nokia 2180 [NHD-4(X)] Nokia 2190 [NHB-2(NB)] Nokia 9000 Communicator [RAE-1(N)] Nokia 9000i Communicator [RAE-4] Nokia 9000il Communicator [RAB-4(NX)] Nokia PT-11 (E-Plus) [NHK-1(EA)] Nokia PT-11 NF (E-Plus) [NHK-4(AX)] |
Nokia 3110 [NHE-8] Nokia 3110 Plus [NHE-8(BX)] Nokia 8110 [NHE-6(BX)] Nokia 8110i [NHE-6(BM)] Nokia 8146 [NHK-6(NX)] Nokia 8148 [NHK-6] Nokia 8148 (NK502) [NHK-6] Nokia 8148 (NK502) [NHK-6(RY)] Nokia 8148i [NHK-6(V)] |
Essentially, the main platform models are 1011, 1610, 2010, 2110, 3110, 8110. The rest are variations for different networks (GSM900/1800/1900), countries, or operators. The 9000 Communicator uses a telephone system similar to (and obviously based on) the 2110. DCT1 models are easily distinguished from DCT2 models - the latter have a screen with a full graphic section (without distinct characters) and a different connector for charging and connecting accessories. Moreover, only the 3110 and 8110 essentially belong to the DCT2 platform; the rest are variations that are similar in appearance. A key difference between these models and the DCT3 and subsequent models is their processor architecture. Beginning with the 6110 model, introduced in 1997, and the beginning of the DCT3 generation, phones began using ARM processors. The DCT1 and DCT2, however, operate on a completely different architecture - the Hitachi H8. This can be easily verified by disassembling the phones - the 2110 uses the H8/500 processor, while the 3110 uses the H8/3001.

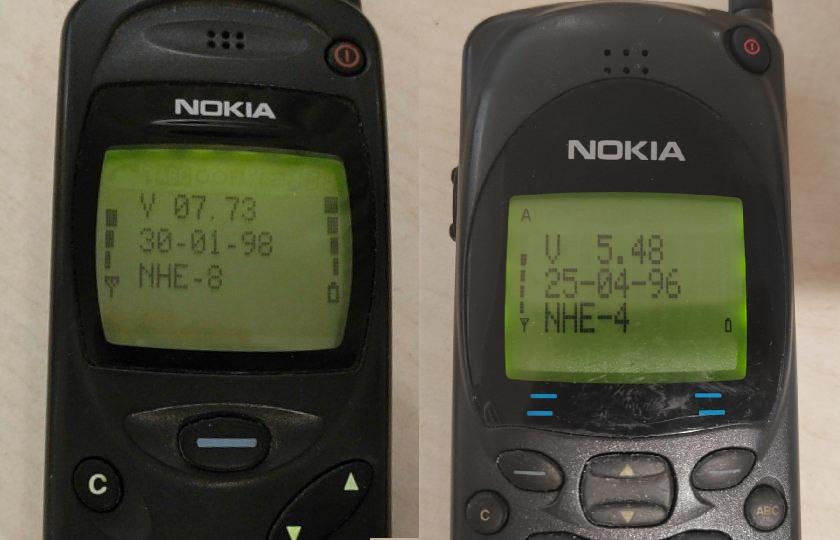
So, I have a couple of 2110 phones and one 3110. Their firmware versions are shown below:
In these models, we can have two security problems - carrier locking (SIM Lock) and user code locking (Security Code).
The first occurs when the phone was manufactured for a specific carrier and sold at a reduced price with the condition
that the user sign a contract agreeing to use and pay for services for a certain period.
In this case, a SIM Lock is installed on the phone, restricting the owner to using only SIM cards from that carrier
(or even just the specific SIM card for which the contract was signed).
The phone will simply refuse to work with other SIM cards.
After the contract expired, the user could request a code to remove this lock, allowing the phone to be used freely with any SIM card.
Contracts, of course, have long since expired, and some carriers have ceased to exist altogether, so few providers now provide codes to unlock these ancient bricks.
The only option left is to act independently.
The second security option allows the user to protect the phone from unauthorized use.
If, for example, a handset were stolen (and given their value at the time, this was a distinct possibility),
the new "user" would be prompted to enter a security code after inserting their SIM card.
By default, on models starting with the DCT3, this code is set to the familiar "12345".
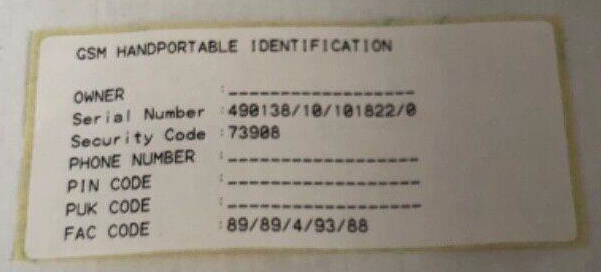
However, this doesn't apply to the DCT1/2. Here, a unique code is assigned to each handset from the factory, calculated based on the IMEI.
The user received this code with the phone on a separate sticker, which, of course, almost no one has kept after 30 years.
It looked like this:
Luckily, there are solutions to both problems. They can be non-invasive (no need to connect the phone anywhere) or invasive (connecting the phone to the PC with a cable).
I'll certainly consider both options.
Non-invasive methods
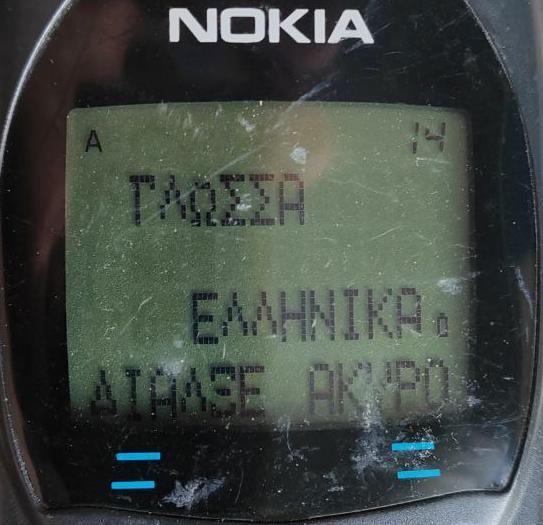
So, let's imagine that our phone has a SIM-Lock. In this case, when inserting a "foreign" SIM card, a message like this will appear on the phone:
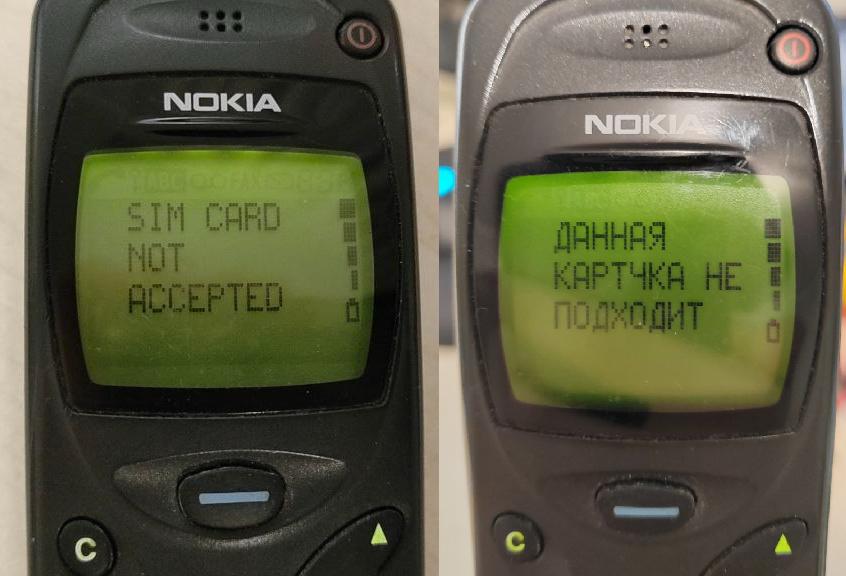
This isn't good news, is it?
The blocking needs to be removed, and the ideal solution would be to figure out the code to unlock it.
The code looks like this: #pw+xxxxxxxxxx+y#
Where xxxxxxxxxx - a 10-digit unique code,
y - the blocking level number.
The p w + symbols are entered by repeatedly pressing the * key.
DCT1-3 has four blocking levels:
- Blocking for a specific network (any SIM card from a specific operator is suitable)
- Blocking by SIM GID1 (only SIM cards with a specific code in the GID1 zone are suitable)
- Blocking by SIM GID2 (only SIM cards with a specific code in the GID2 zone are suitable)
- Blocking by IMSI of a SIM card (only a SIM card with a specific serial number will work)
Specifically, on DCT1/2, apparently only level 1 was usually used, so we'll focus on that.
This code is generated based on the specific phone's IMEI and the operator's network code, which looks like xxx-yy.
xxx - the country code (Mobile Country Code, MCC),
yy - the operator code (Mobile Network Code, MNC).
Therefore, knowing the operator (often, at that time, their logo was still printed on the case), you can find their MCC-MNC code online.
Operator variant tables are also available for phones; the model code (Product code) is indicated on the IMEI sticker, under the "Type" parameter.
For the NHE-4 type models - DOWNLOAD (TXT)
For the NHE/NHK-5,6,8,9 type models - DOWNLOAD (TXT)
After finding out the operator code, you can use the calculator - there are two most well-known options:
SP Lock Code Generator (SPL)
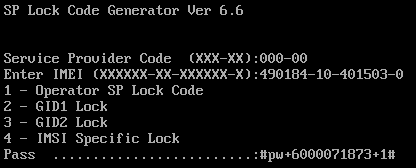
A simple DOS application (run in DOS-BOX or on older 32-bit Windows) that allows you to generate codes for any of the four lock levels. The version I've posted is cured of the Runtime error 200 (a common problem), which occurs when running the program on processors faster than 180MHz.
Crux Calculator
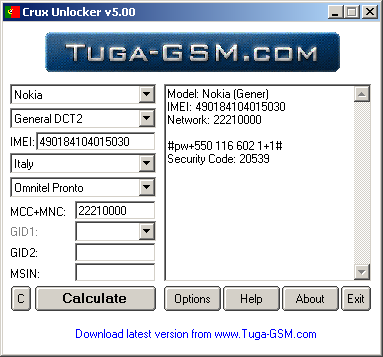
A universal unlocker for DCT1-4 phones. It has a built-in operator database (no need to search for MCC-MNC codes) and also generates codes for 4 levels. For DCT1-2 phones, use the "General DCT2" profile. In this mode, it also generates the factory Security Code (the same one supplied on paper). Just remember to disable (if enabled) the IMEI checksum check (the last digit; in early GSM phones, it is always 0, because the checksum hasn't been introduced yet).
So, after entering the code, there are 4 possible scenarios:
- "SIM RESTRICTION OFF" message - congratulations, you have successfully removed the SIM lock and your phone is free!
- "CODE ERROR" message - you entered or generated an incorrect code - check your IMEI and operator code.
- "NOT ALLOWED" message - unfortunately, you (or someone before you) have exhausted all 5 attempts to enter the code for this level - this method will no longer work for you.
- "SIM WAS NOT RESTRICTED" message - there is no block at the level you are trying to unlock, it is present at another level(s).
If you're unlucky and don't know your carrier or receive a "NOT ALLOWED" message - don't worry.
Most phones have a vulnerability that allows you to temporarily bypass SIM Lock.
To do this, you'll need to enable the PIN code on your SIM card.
Then, when the phone prompts you to enter the PIN code (before the message that your card was rejected), do the following:
- Press the C (clear) key.
- When the screen clears, enter a code in the format **04*xxxx*xxxx*xxxx#, xxxx is your PIN code (after entering each * at the beginning of the code, wait until it blinks).
- After entering #, the "CODE ACCEPTED" message will appear and the phone, forgetting about SIM-Lock, will let us into the system.
Video demonstration:
Now let's talk about the Security code. If you turn on your phone with a SIM card that wasn't previously in it (it stores a list of the serial numbers of the last few SIM cards) and the previous owner activated security, the phone will ask you for the security code:
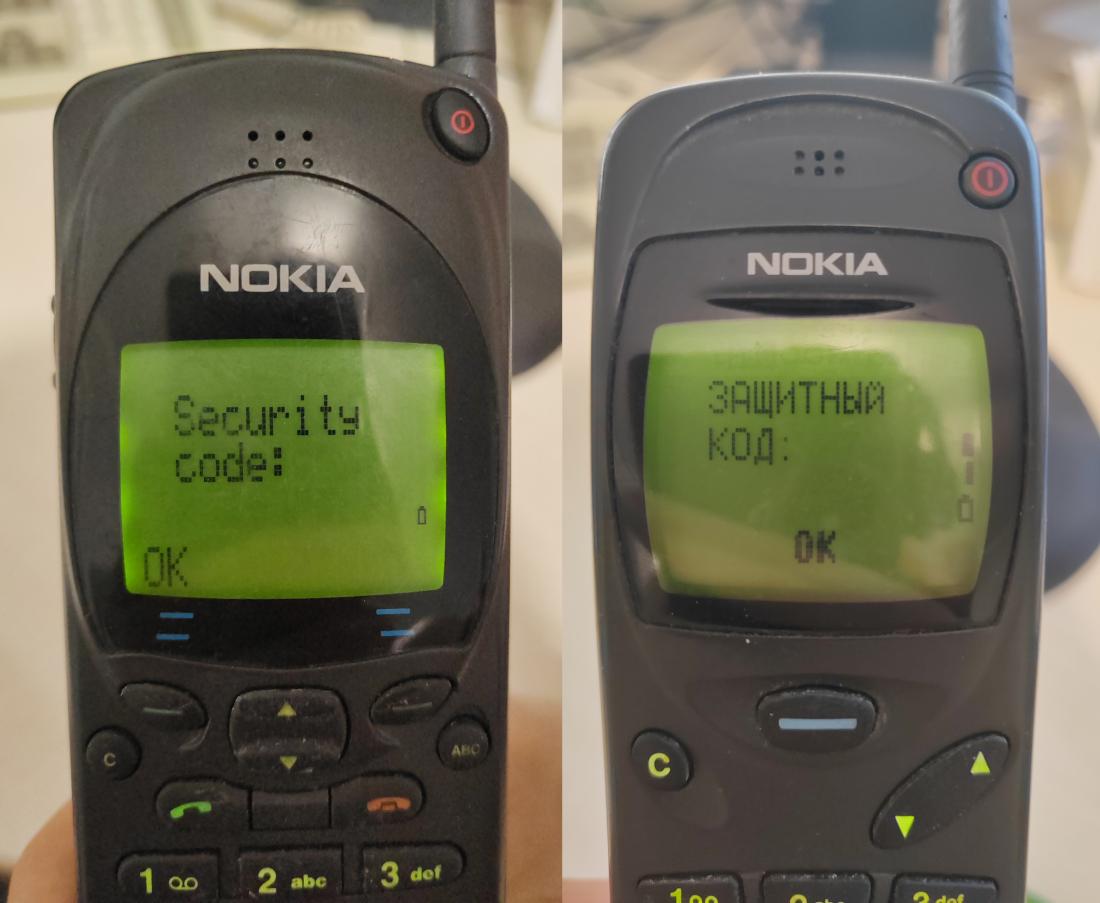
In this case, the code is a 5-digit sequence. As mentioned, these models come with a unique factory code by default. Therefore, if the previous owner didn't replace it with their own, you have a chance to find it using a non-invasive method. There are two main utilities for calculating the factory code using the IMEI:
IMEINOKIA
A DOS application that allows you to generate a code.
Simply enter your IMEI and receive a Security code in response.
Crux Calculator
As already mentioned, it can also generate a Security code if you try to generate a Sim-Lock code for any operator.
If you entered everything correctly, but the phone displays a "CODE ERROR" message, you're unfortunately out of luck. The previous owner changed the code to their own. PIN bypass won't help here either; even after changing the PIN, the phone will still ask for the security code, I've verified this.
There is a potential solution (without connecting the phone to a PC) - DCT1-4 phones have a legal "backdoor" called a master code. This is a 10-digit code that can be entered instead of the unknown user code to unlock the phone (and then set a new code). For DCT3-4 phones, it can be easily generated using the IMEI. You can visit nfader.su or download the program.
As for DCT1/2... I still haven't found a program capable of calculating the code, as the algorithm is clearly different for them. I'm afraid no one has dared to crack it. This code (like the current security code) can be found using a cracked version of the official WinTesla service program (see the Heavy Artillery section).
Unfortunately, the service program doesn't calculate it; it simply queries the phone with a command.
So, in the best-case scenario, the algorithm is stored in the phone's firmware. In the worst-case scenario, the code was pre-calculated at the factory and loaded into the EEPROM...
Maybe someone can figure this out.
Here's what the query commands from WinTesla look like:


MBUS packets with request and response for Secure code and Master code on Nokia 2110
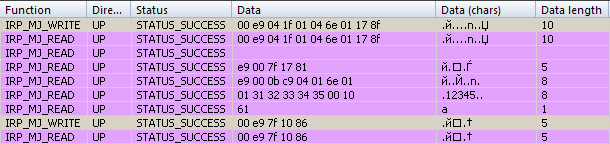
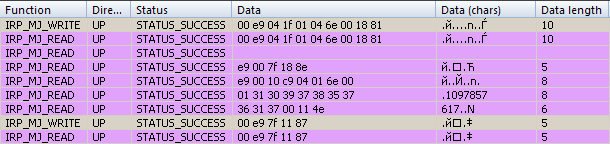
MBUS packets with request and response for Secure code and Master code on Nokia 3110
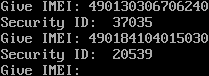
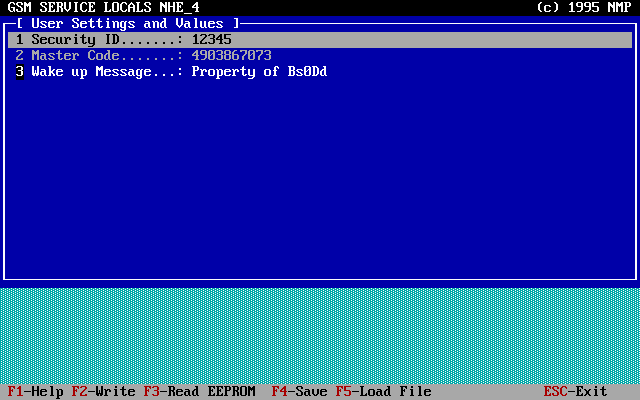
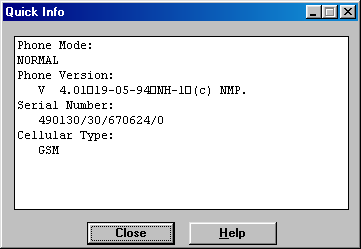
Here are the master codes for my models - maybe someone can figure out the connection (unlikely)...
| Model | IMEI | Master code |
|---|---|---|
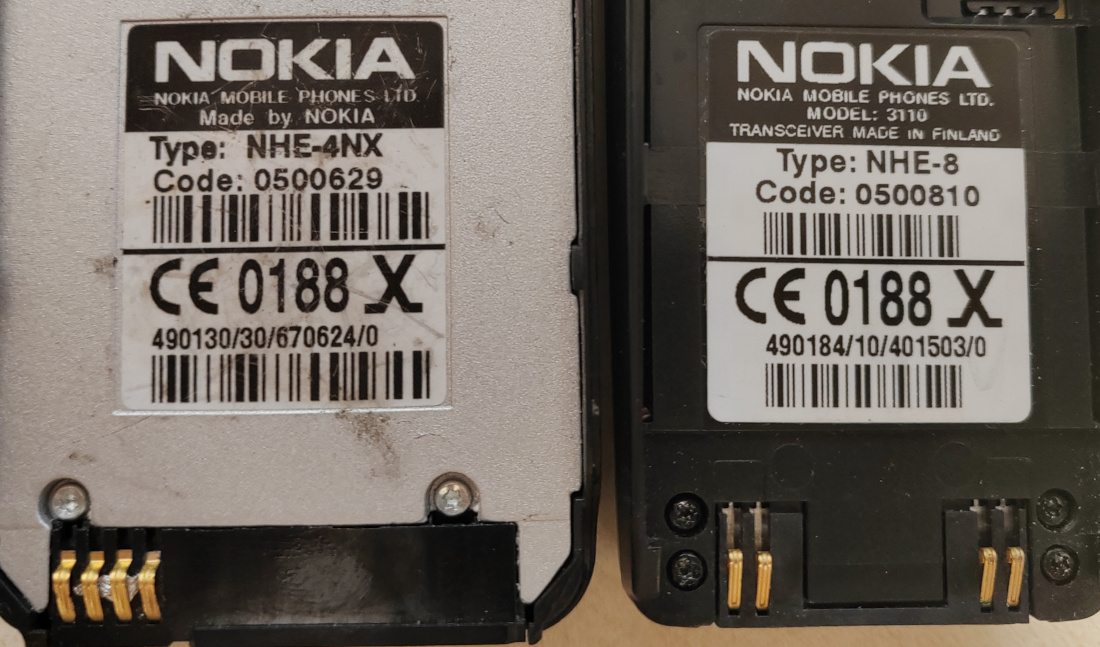
| 2110 | 490130/30/670624/0 | 4903867073 |
| 2110 | 490130/30/670636/0 | 2345380534 |
| 3110 | 490184/10/401503/0 | 1097857617 |
The Great MBUS
So, you couldn't remove the SIM lock with a code or unlock your phone with the factory combination?
Don't worry! It's possible to read the phone's data!
However, it requires some simple equipment and a steady hand! This is generally for experienced users.
Nokia phones have two data buses for communicating with a PC - MBUS and FBUS.
- MBUS (Message BUS, also officially known as M2BUS) - a bidirectional (data flows in both directions on one line) TTL bus
with a fixed 9600 baud rate and an 8-O-1 configuration (8 data bits, 1 stop bit, and odd check bit).
For DCT1/2, it is the primary bus for communicating with the PC, and proprietary utilities use it.
A basic description of MBUS frames is available here.
- FBUS (Flash BUS) - a bus originally designed for flashing phone firmware. It is similar to RS232 (speed up to 115200, RX and TX lines), except for the TTL voltage. Configuration is 8-N-1 (8 data bits, 1 stop bit, no control). With the advent of DCT3, the bus began to be actively used for data exchange with PCs, especially in modem mode. In this generation, most MBUS commands can also be transmitted via FBUS. You can read more about it here.
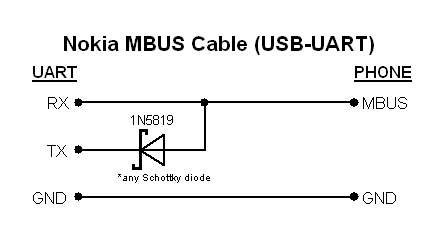
To make the simplest available version of this cable, you'll need:
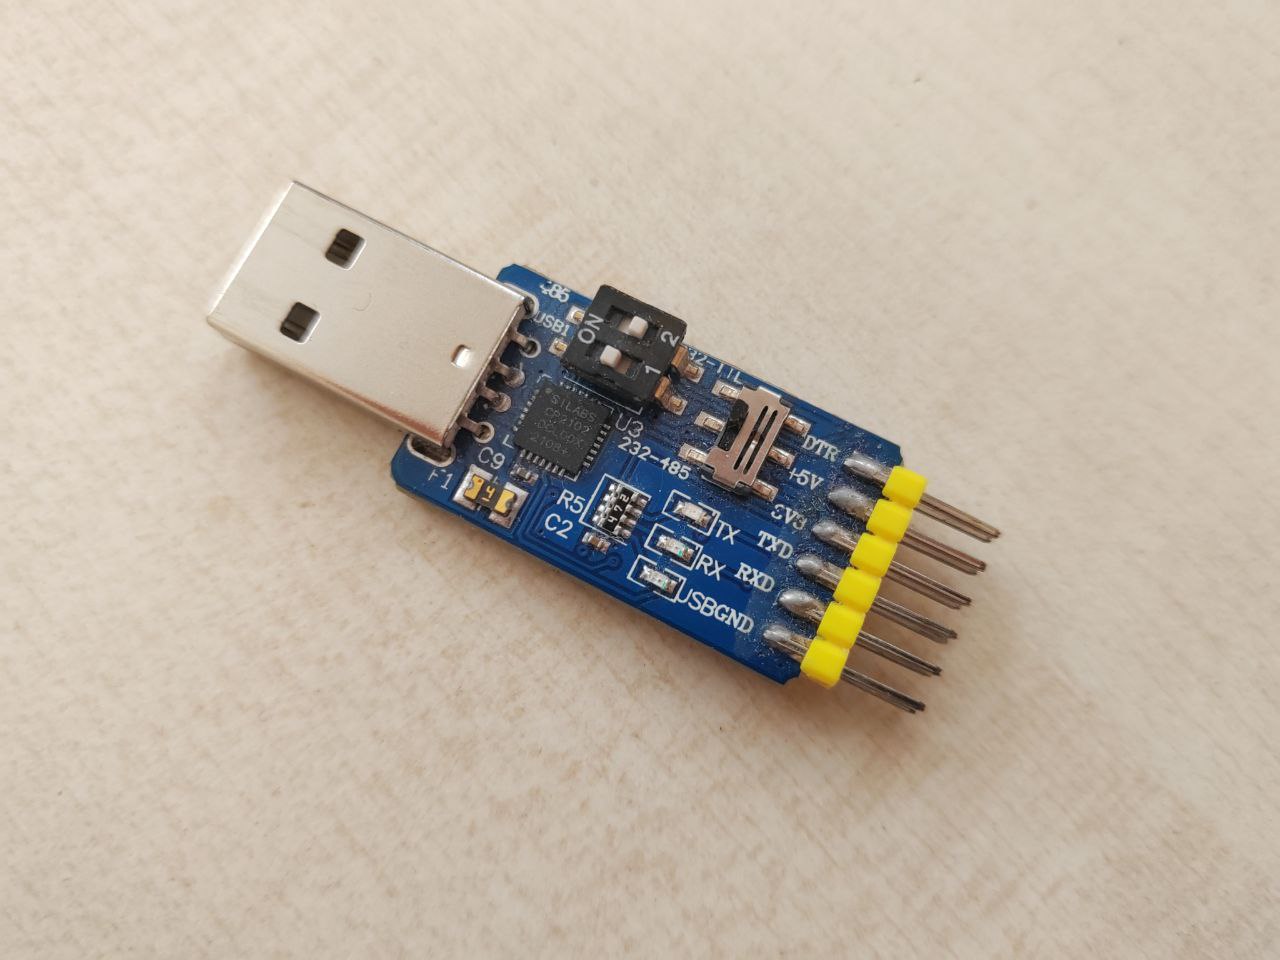
- A USB-UART adapter. Typically based on PL2303 or CP2102 chips. It's highly recommended that it have either a TTL voltage switch (5/3.3V) or a fixed 3.3V voltage.
-
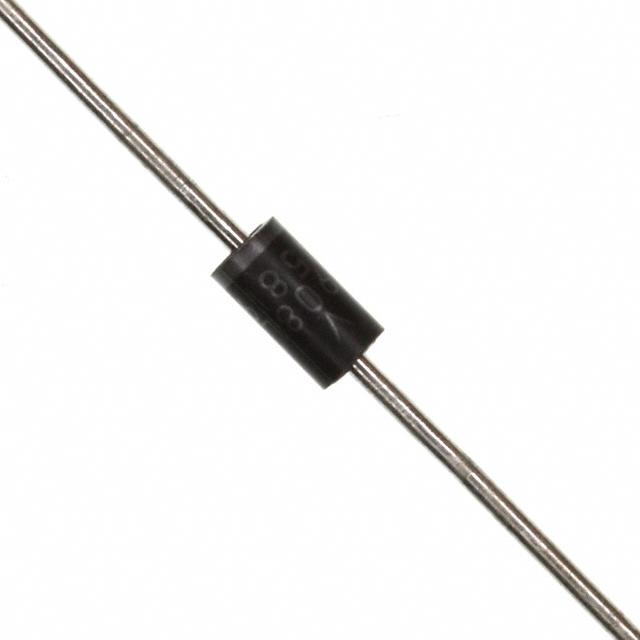
Schottky diode: 1N5819 or similar. It's important to use a Schottky diode; a regular one won't work due to its high voltage drop.
- Wires, how could we live without them?
- Something to fix the MBUS line wire to the phone (the ground can be attached to the antenna connector).
Finally, we'll have just two lines: ground and MBUS. Connecting ground to the phone is easy, but MBUS is a bit more involved.
The connectors on these models aren't very convenient, and getting the plugs is problematic, I'd even say nearly impossible.
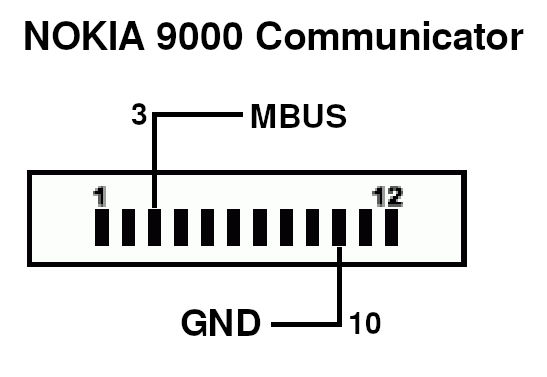
So, I know of three types of connectors in this generation:
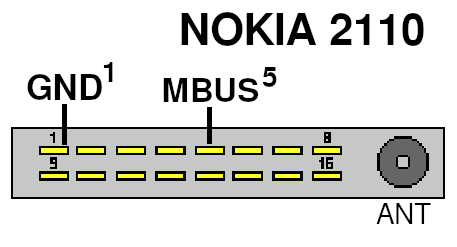
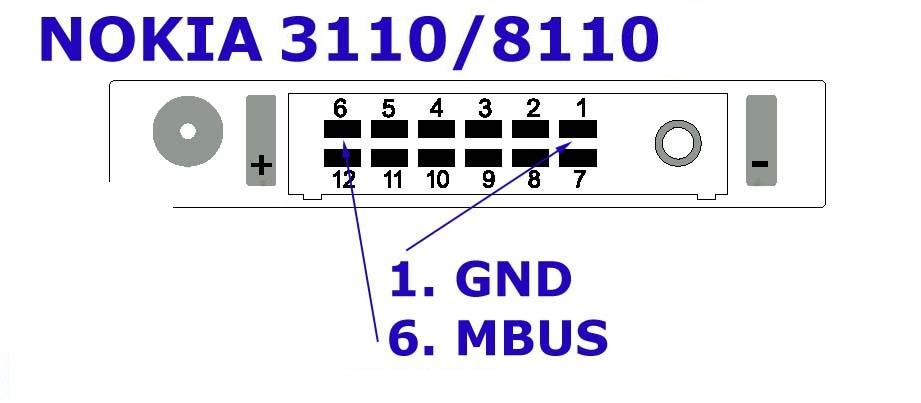
So, using what we have, we assemble the cable. Here's what it looks like with the 2110 and 3110 connected:
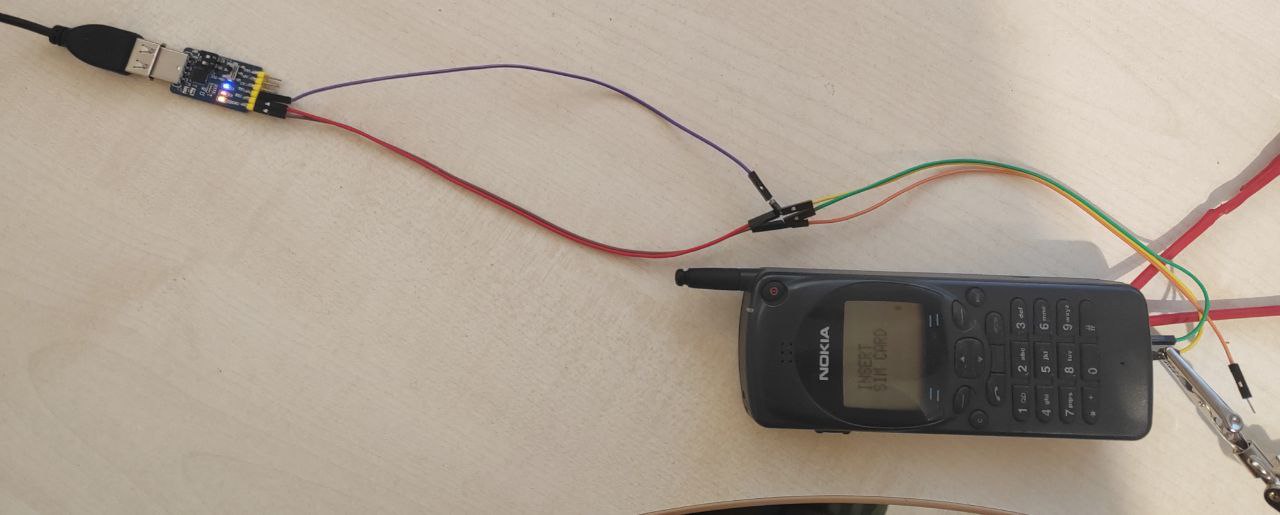
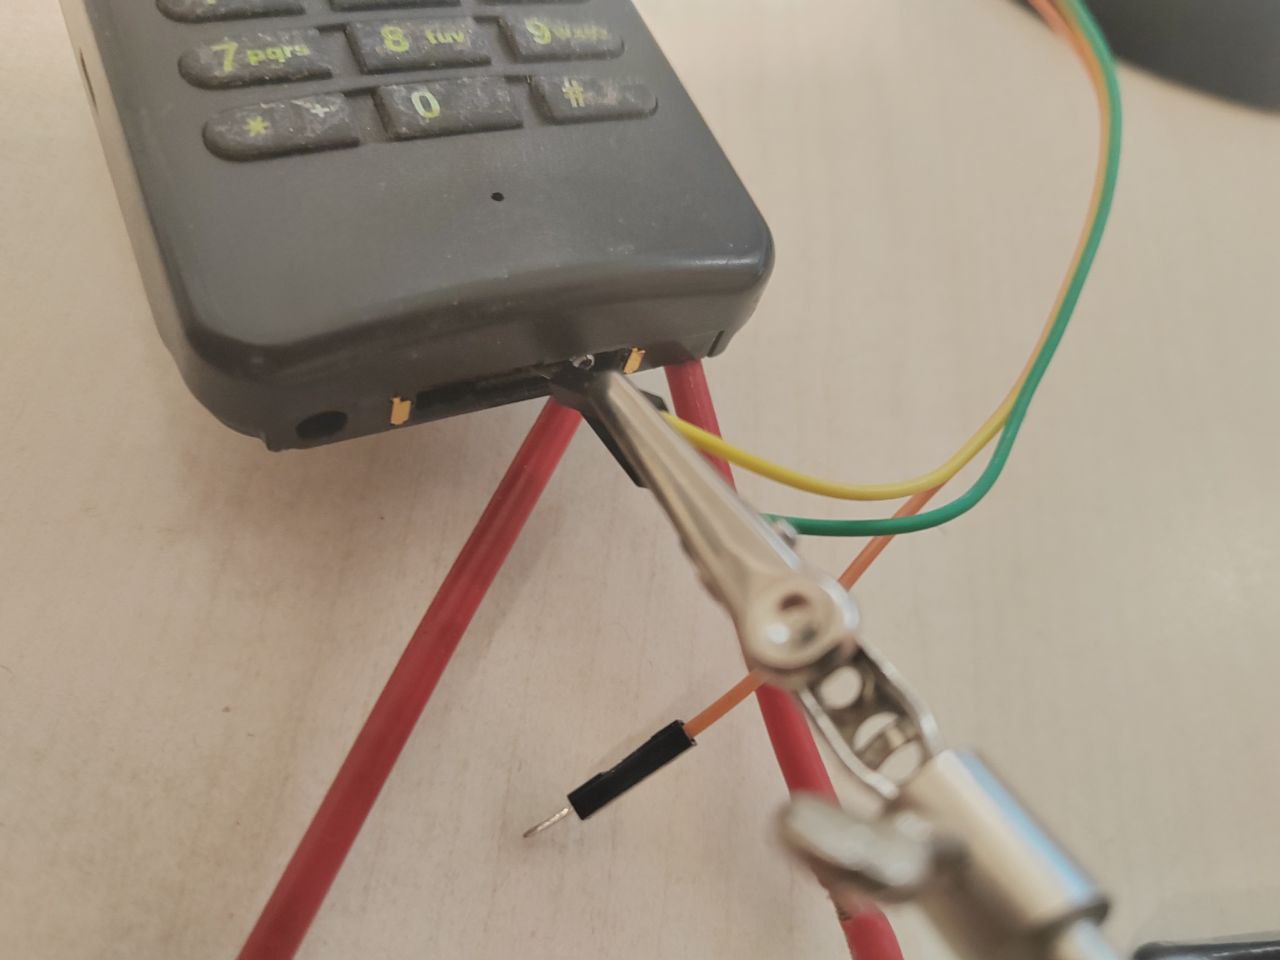
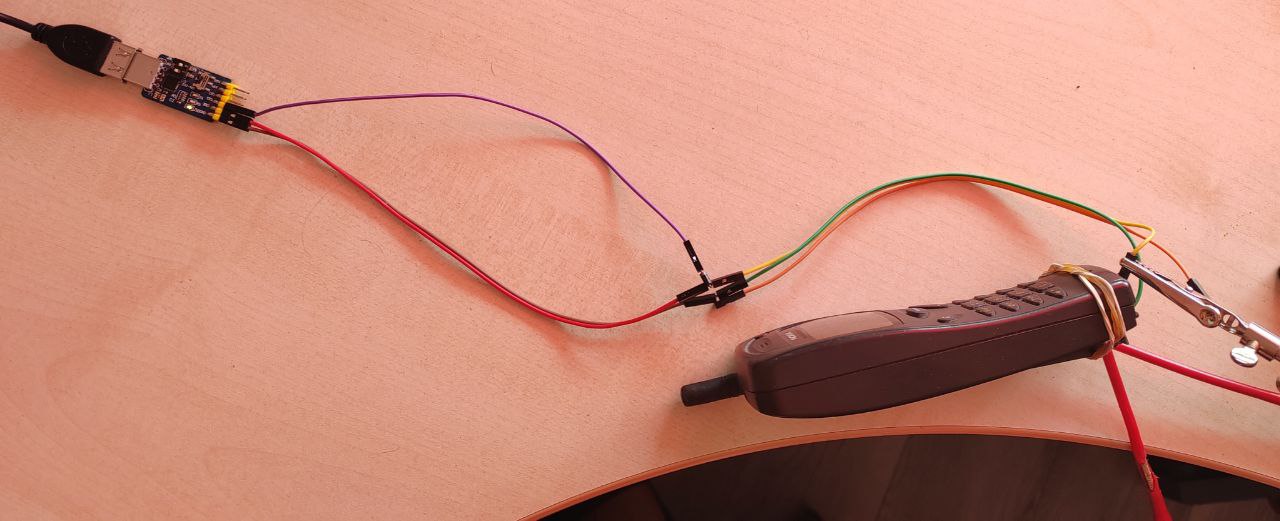
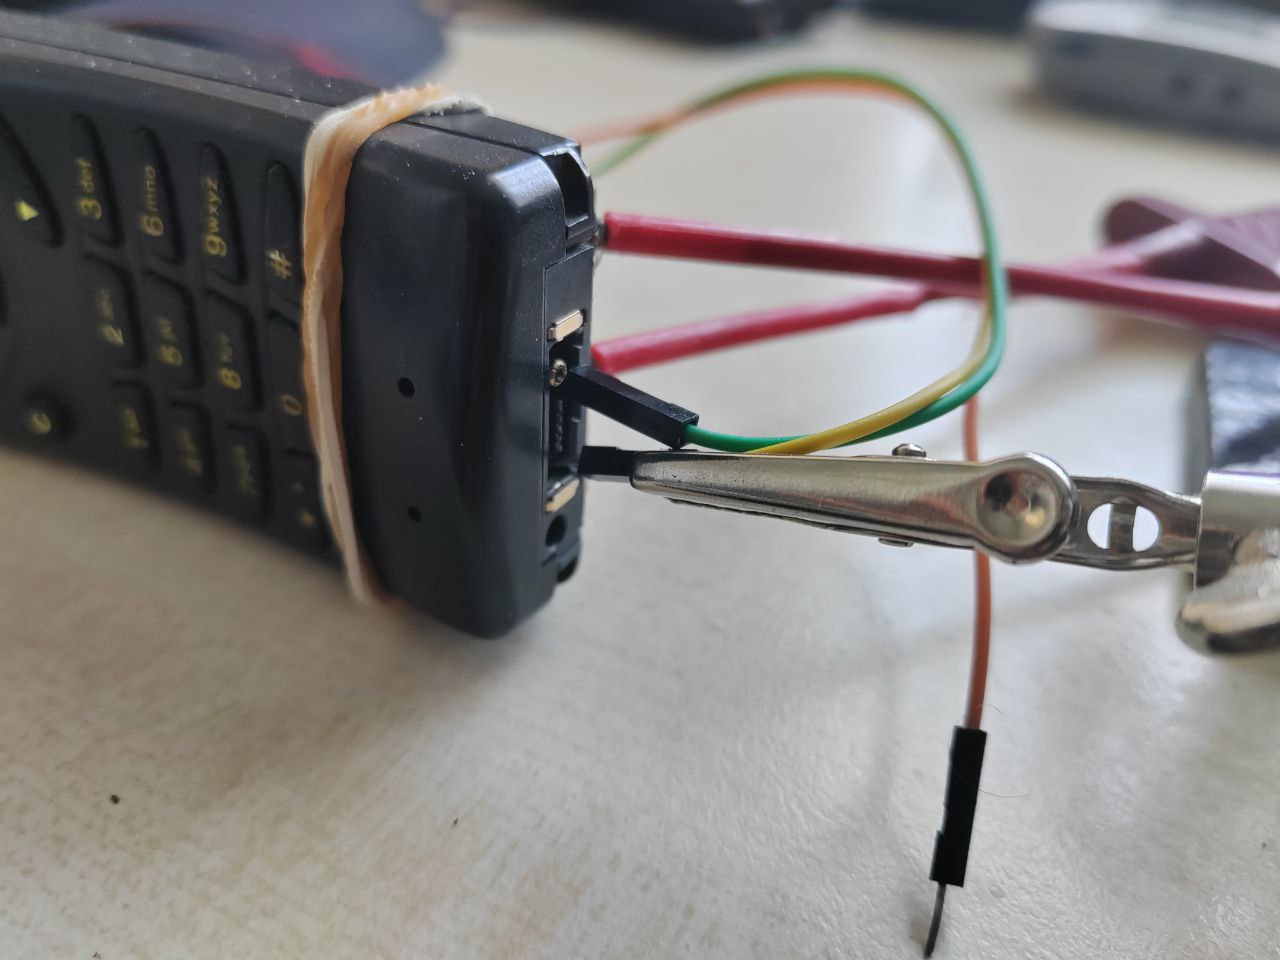
I chose "Dupont" cables; everything is assembled and works without any soldering.
However, given the age of the software, it would have been better to make a COM cable, but this option, as I already said,
is the simplest and cheapest nowadays, + it doesn't require a COM port, which is rare these days.
If you prefer, you can use a COM-UART cable, which was usually made according to a diagram like this:

And similarly "upgrade" it to MBUS.
Or, you can make a cable from scratch using Dejan Kaljevic's diagram:
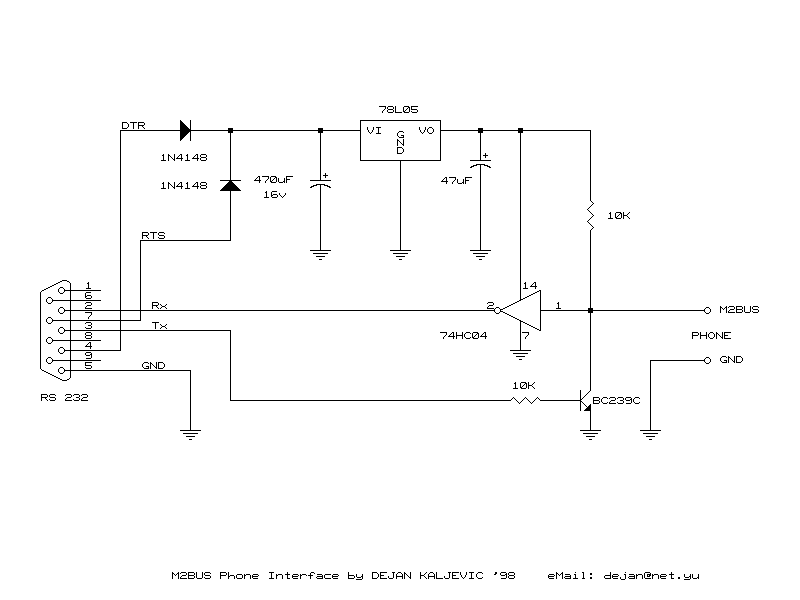
To work with a USB cable, it's best to set up a virtual machine running Windows XP or even Windows 98SE.
As variant - use VirtualBox.
I recommend connecting the USB cable to the virtual machine as a real COM port (I had problems with USB passthrough),
the setup looks like this:

In my case, the USB adapter is the /dev/ttyUSB0 device. In Windows, you'll need to select the COM* port assigned to the adapter by the system.
So, what do we have in terms of unofficial service software:
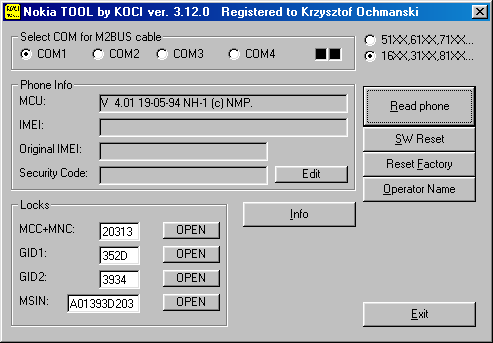
Nokia TOOL by KOCI
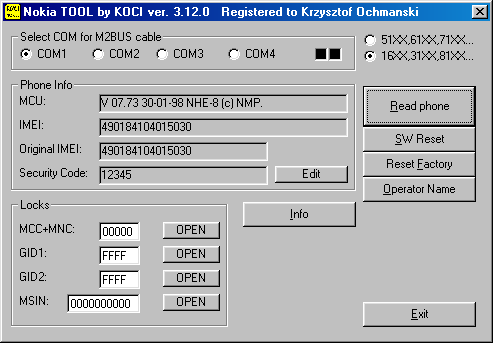
DOWNLOAD (3.12.0, recommended)
DOWNLOAD (3.52.0, latest)
This app by Tomasz Kocian is designed for working with DCT2 and DCT3 phones.
The DCT3 features are outdated, but the DCT2 mode is very useful.
Select "16XX,31XX,81XX" and the COM port number, and you can read data from the phone.
For DCT2 phones, the app lets you view and change the Security Code, view SIM Lock values, and remove locks with one click.
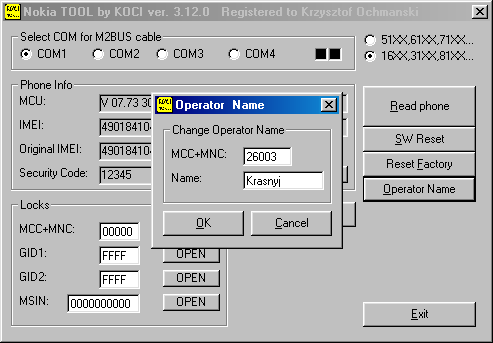
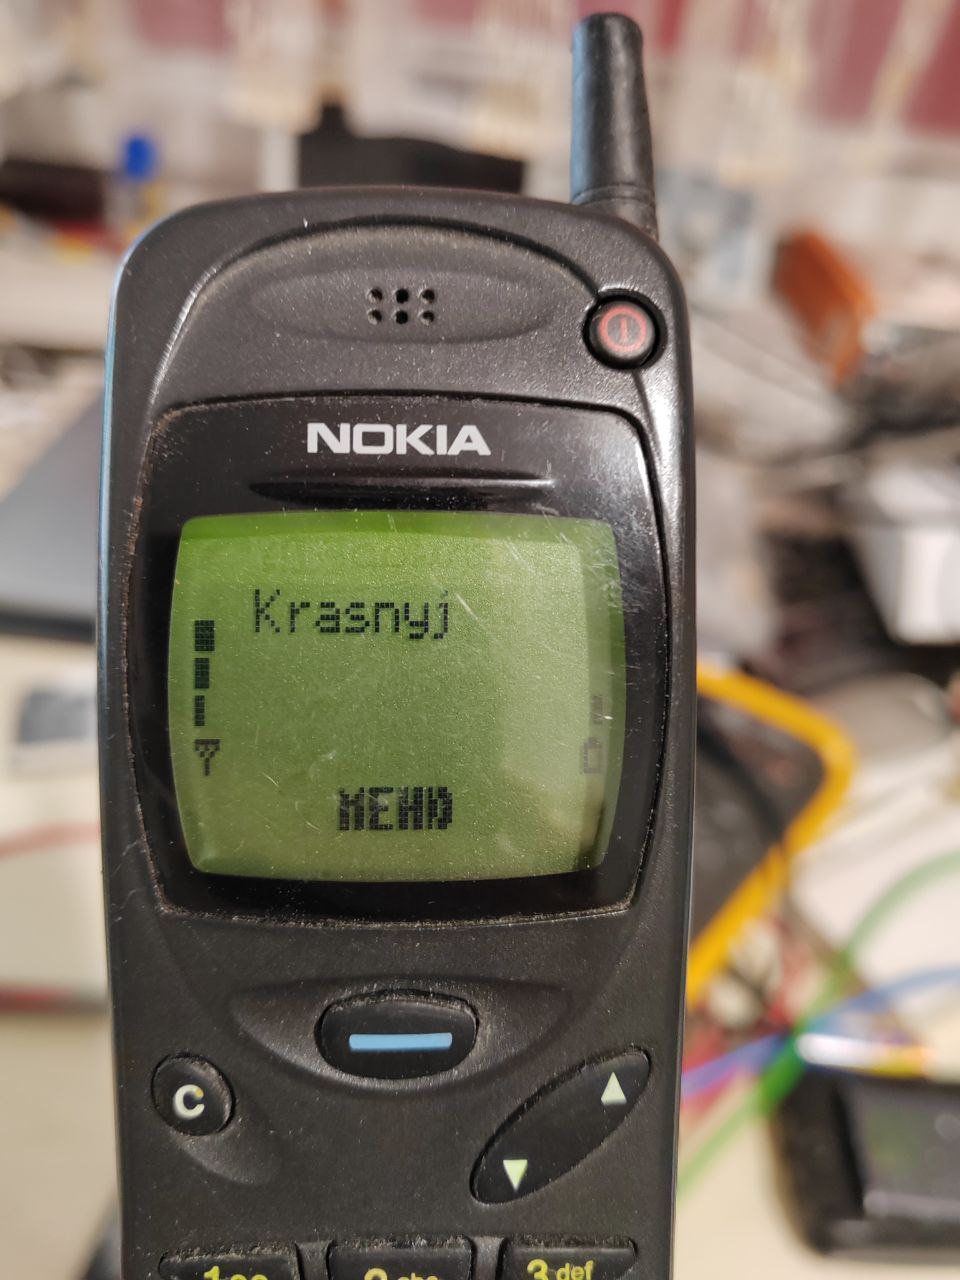
It also lets you set a custom name for a specific carrier, which will be displayed on the screen.
Its major drawback is that, contrary to its claims, it does NOT support the 2110 and (most likely) related models. Unfortunately, they use different control commands, so Nokia TOOL cannot read adequate data.
I recommend using version 3.12.0, as version 3.52.0 isn't fully cracked -
most features refuse to work, considering the app not activated.
Also, rumor has it that the unlock function may not work on some versions of the 8110 model.
In this case, however, you can use a SIM Lock calculator, calculate the code based on the information provided, and enter it.
Nokia Phone Info
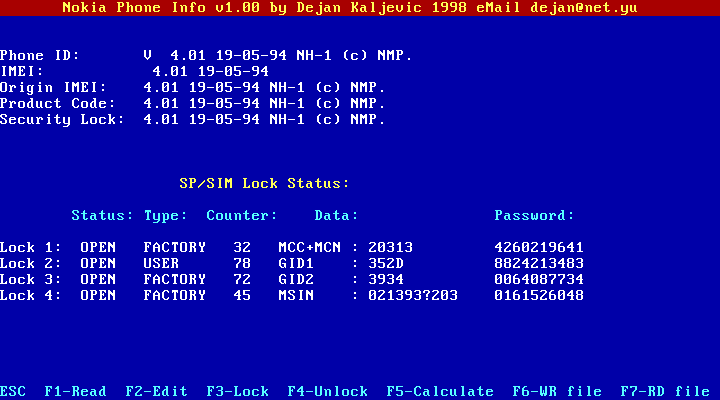
An older program with similar functionality by Dejan Kaljevic, written for DOS DPMI (requires Windows or an extender). It has a pseudo-graphical interface and can calculate SIM unlock codes. Unfortunately, it suffers from a similar issue: it doesn't work with the 2110, as you can see in the screenshot. It also seems to be sensitive to PC specifications; for me, it rarely establishes a connection, often giving an error immediately. Therefore, I recommend the program above.
Heavy artillery
So, let's say we now know how to unlock models like the 1610, 3110, 8110.
But what about a locked 2110 (and related models)?
Unfortunately, this requires heavier artillery, i.e., official service software.
Let's start with the simplest:
GSM SERVICE PCLOCALS
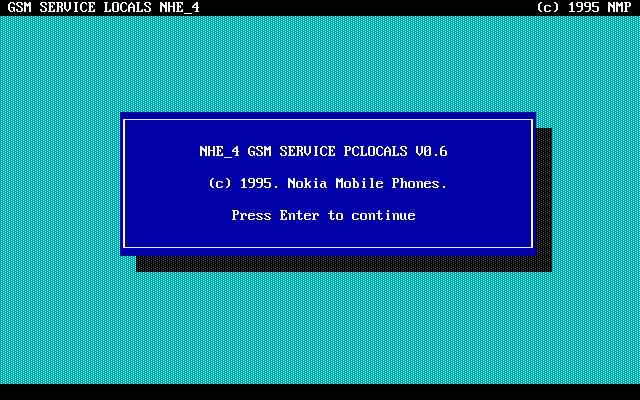
This is the official program for the 2110 (NHE-4) model, and may also work with related models. Unfortunately, it requires DOS and a COM cable to function properly. However, it has a decent number of features, although it unfortunately doesn't support SIM-Lock functions.
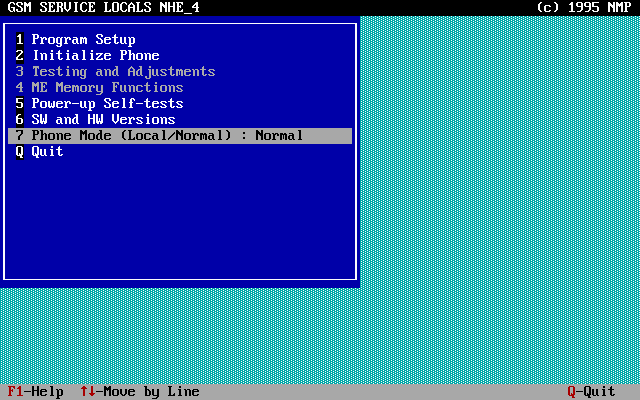
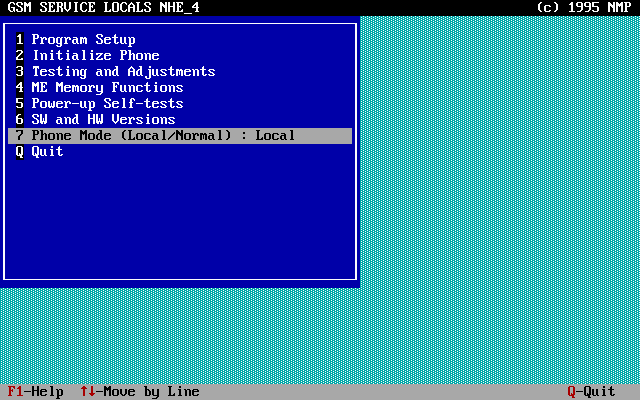
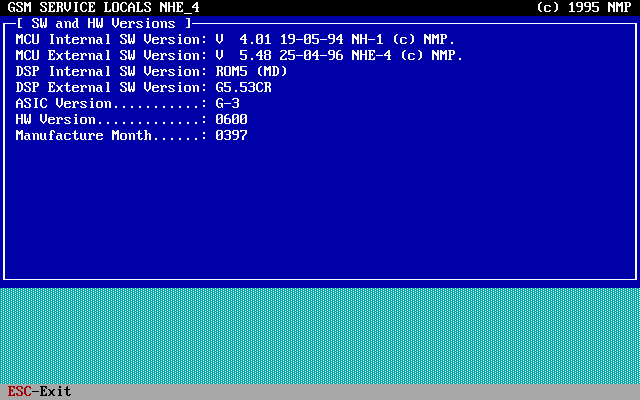
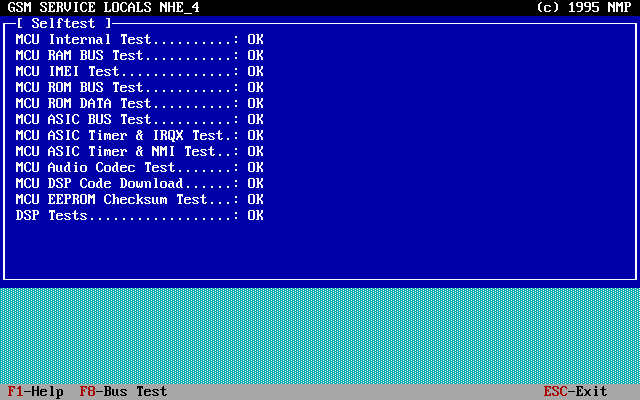
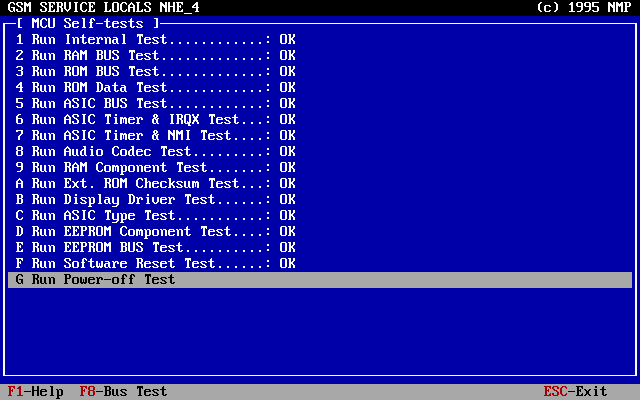
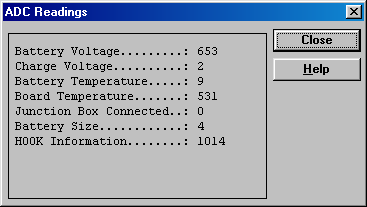
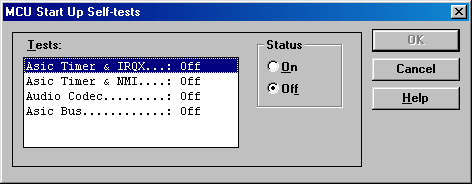
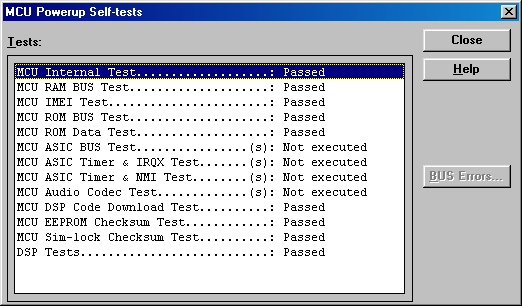
You can view information about your phone's software and the results of the power-on self-test.
Once the phone is in Local (service) mode, other options become available. You can now edit the phone's data; there's a separate section for that.
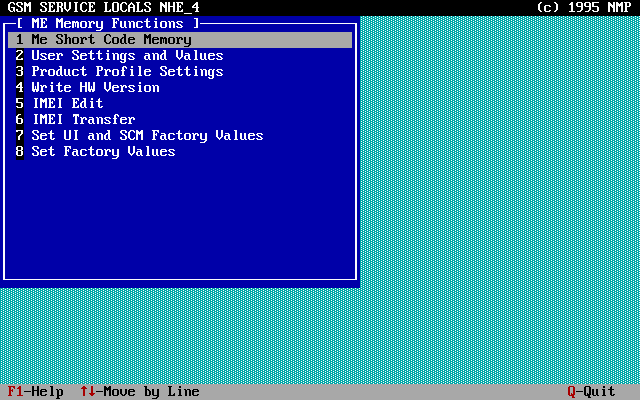
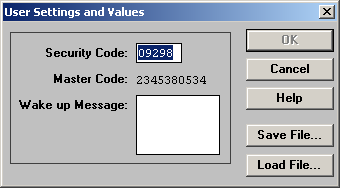
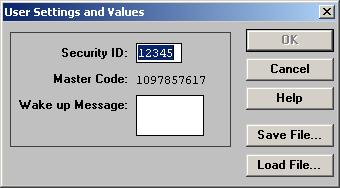
And most importantly, you can read your current Security Code (and change it instantly), as well as your Master Code! Plus, you can set the text for the welcome screen.
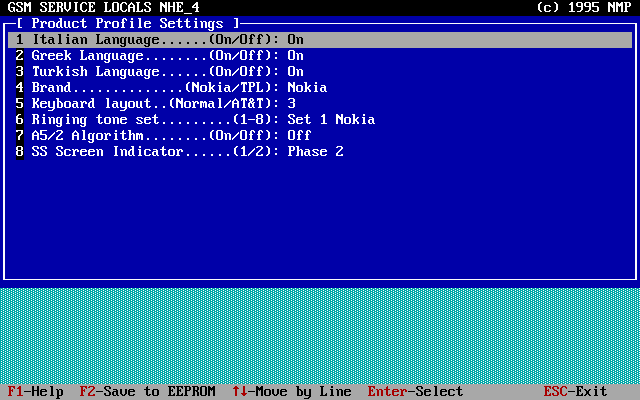
You can also change settings, for example, enable additional languages (present in the firmware, but hidden).
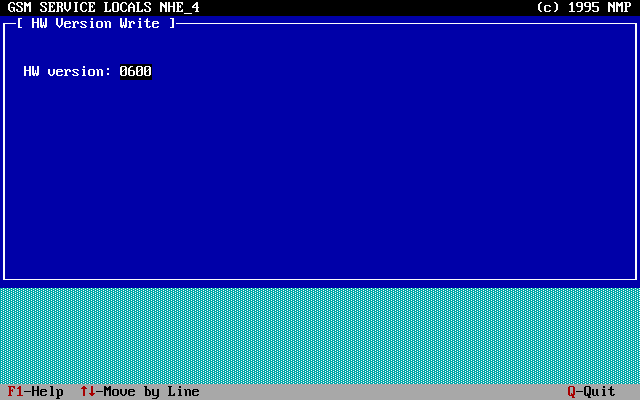
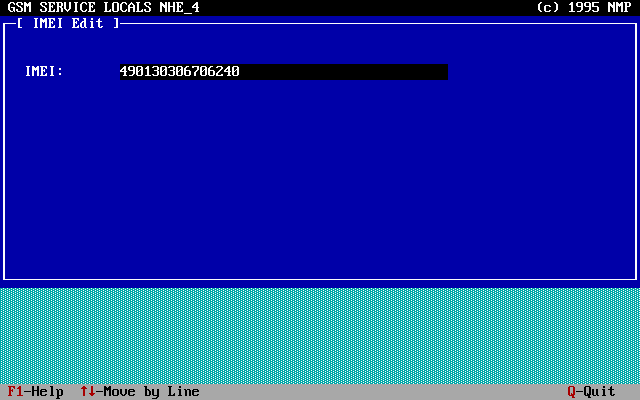
You can also change the phone's hardware version number and IMEI. However, the latter doesn't seem to want to change. The program seems to send it to the phone, but it has no effect, tested it on two phones. Perhaps some additional steps are required - only Nokia employees would know about this.
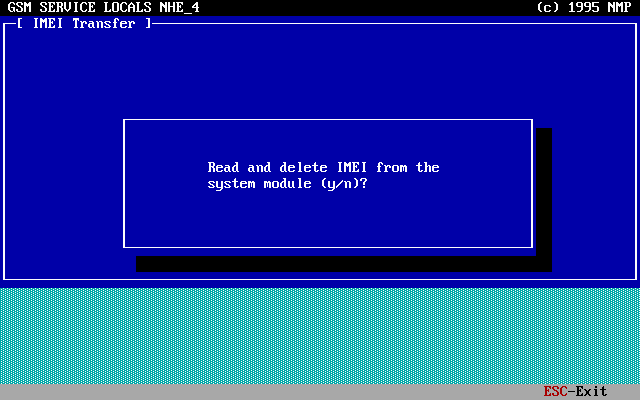
Next comes the IMEI transfer function. This is intended for use if a hardware fault is detected during service repairs
and the board needs to be replaced. In this case, the IMEI code is transferred from the faulty board to the new one.
This erases the IMEI code from the old board's EEPROM, making it completely inoperable.
WARNING: Do not use this function under any circumstances!
You risk making your phone inoperable. The only solution is to flash the EEPROM chip. You have been warned!
The last two options - a partial and full factory reset. This also resets the user code to the one calculated based on the IMEI. There's nothing else of interest to say about these options.
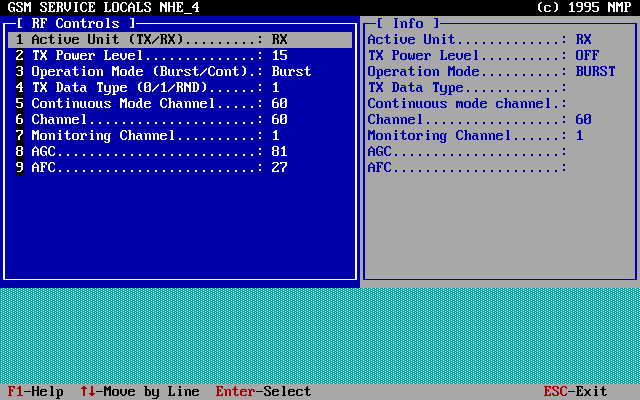
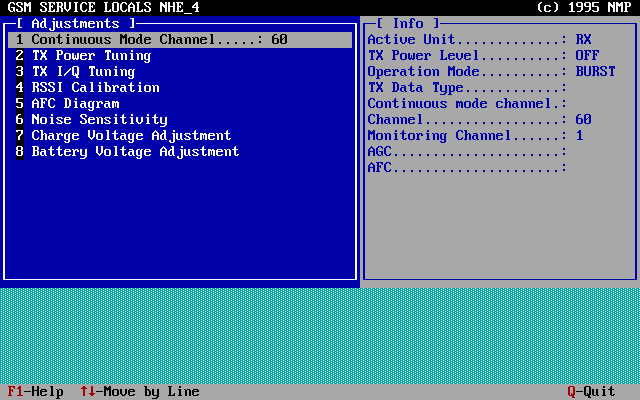
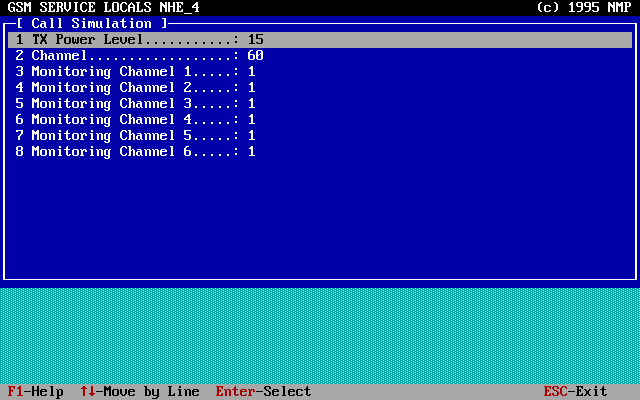
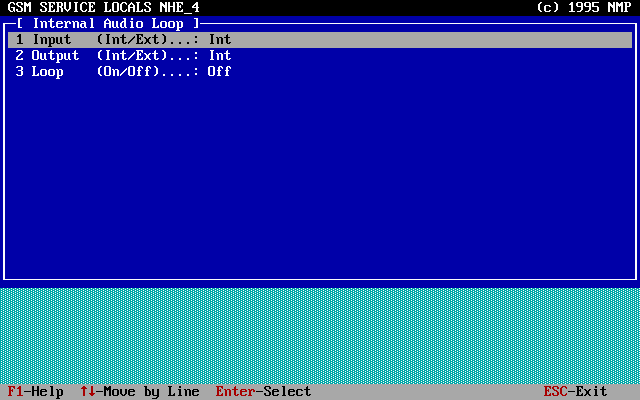
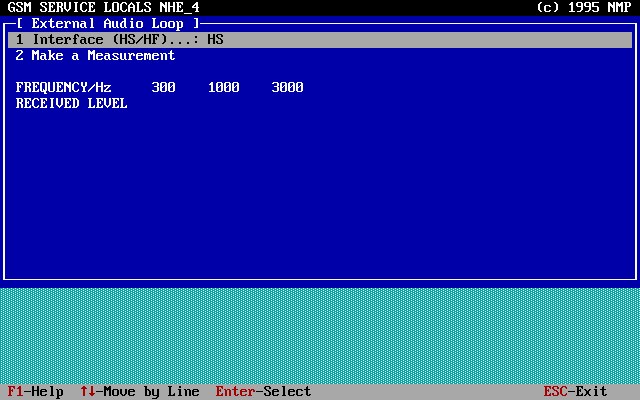
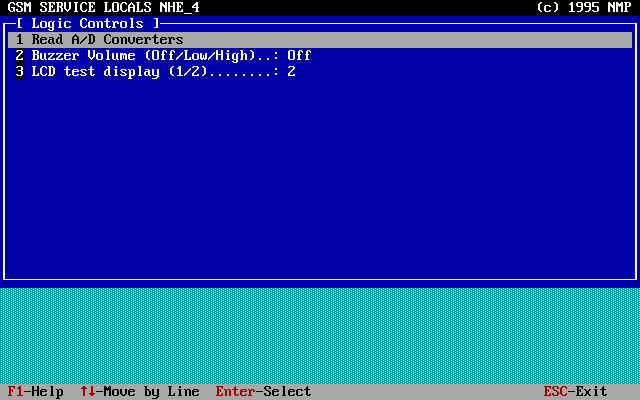
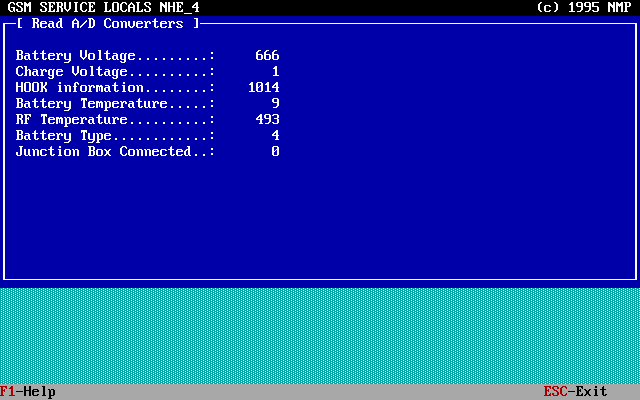
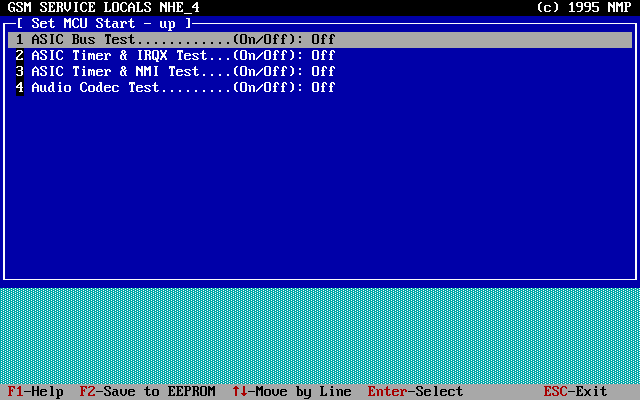
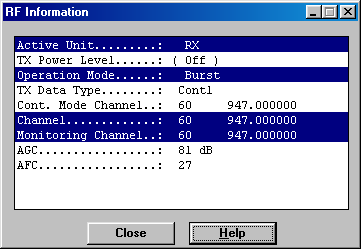
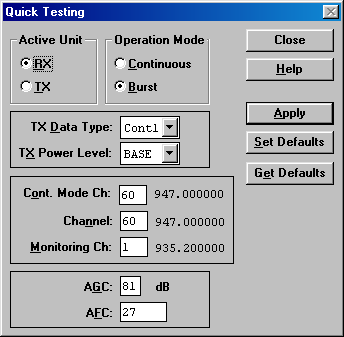
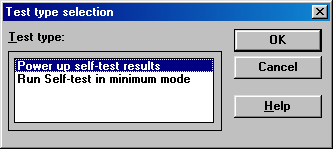
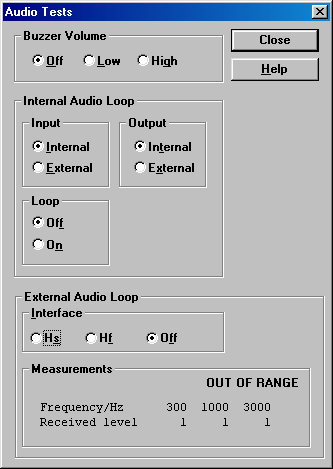
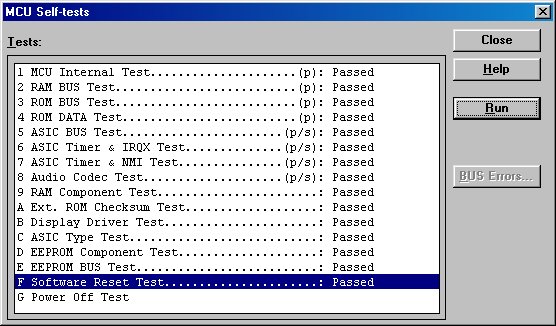
Another main menu item - Testing and Adjustments. Here, as the name suggests, you can test and tune certain parameters of the telephone system.
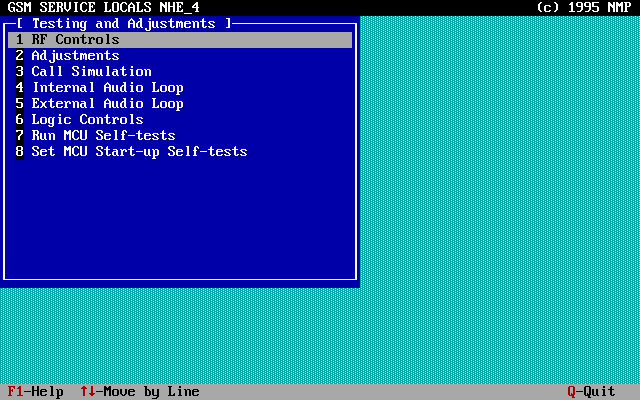
This menu isn't useful for us, as adjustments should be performed by qualified personnel using specialized equipment.
Changing the values (of course) risks disrupting the phone's normal operation!
So, I'll simply provide an overview of these submenus:
Finally, we are left with the most powerful publicly available program:
WinTesla
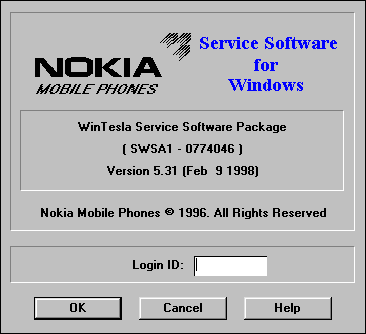
WinTesla is a service software for working with DCT1-3 generation phones (starting with DCT4, it was replaced by Phoenix).
The program is written for Windows 3.1, but can be used successfully with Windows 98 and, with somewhat less success (crashes are observed), with Windows XP.
This is its main advantage over PCLOCALS.
I offer a cracked version 5.31 from 9.02.1998, along with a set of components for supporting DCT1-2 phones.
This is what the program interface looks like after launch:
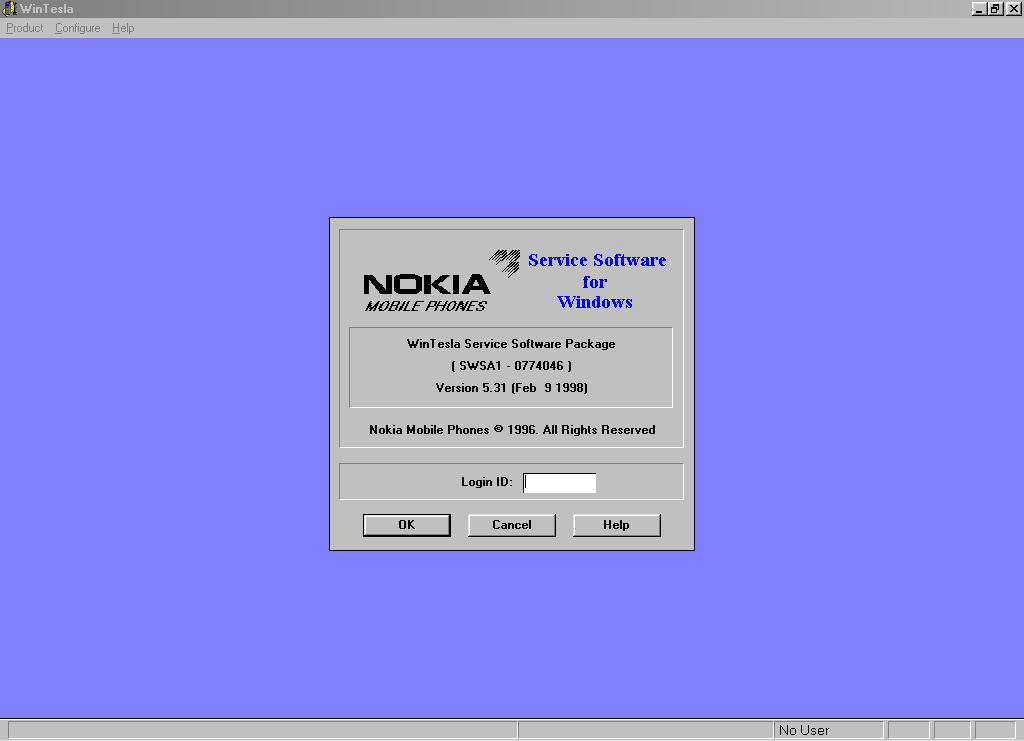
We don't need to specify an ID to work, so just click OK.
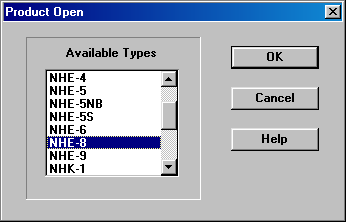
To establish a connection with the phone, select Product -> Open...
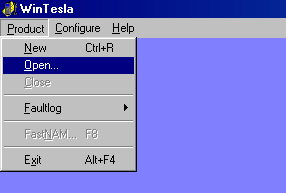
Here we select our model depending on its code:

The program will now attempt to connect to the phone. If successful, the phone will reboot and the number of options in the program menu will increase, indicating a successful connection.

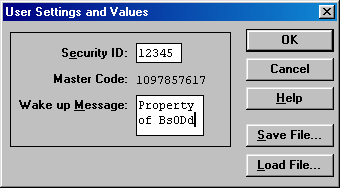
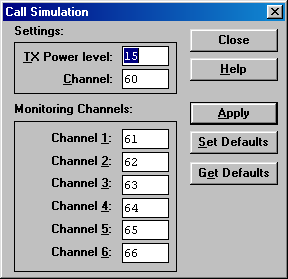
Overall, the main feature set is not much different from that in PCLOCALS for 2110. Of course, we can read the Security Code, Master Code, and set a greeting:

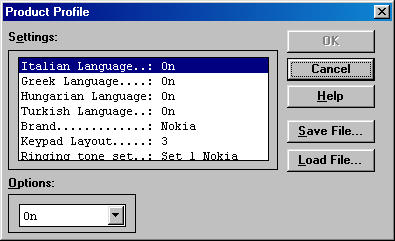
The same special settings (Product Profile) can be changed:
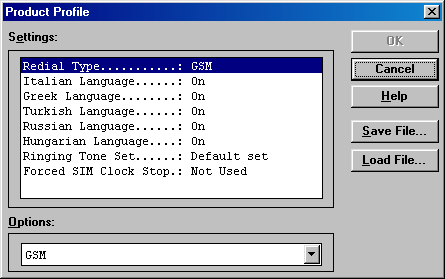
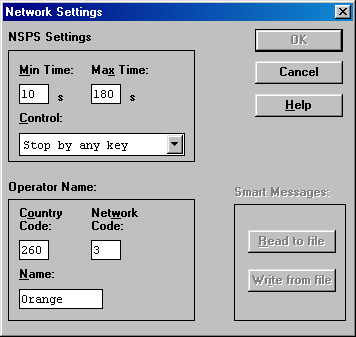
For the 3110/8110, you can also enable a special network search mode (for testing purposes) and set a custom operator name (as in the KOCI app). For the 8110i, Smart Messages can be read and written.
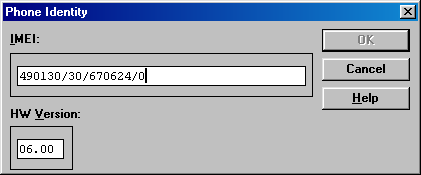
For the 2110, the window for changing the IMEI and hardware version number looks similar to PCLOCALS. Yes, changing the IMEI doesn't work either; the new number simply isn't saved.
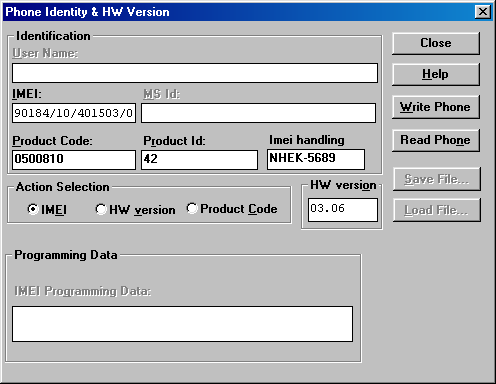
For the 3110/8110, the window looks different. In addition to the above, you can change a certain Product ID and Product Code (unique for each phone subversion).
And changing the IMEI doesn't work again! The program successfully writes other data, but when trying to change the IMEI, it returns a "General error".
Perhaps there's some kind of deliberate protection here... I don't know.

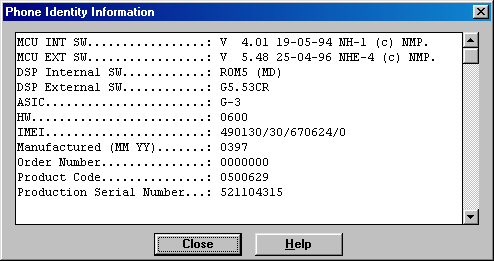
For phones, you can also find general information…

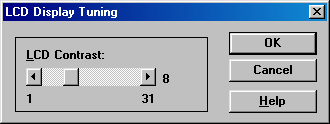
The 3110 and 8110 have a display contrast adjustment feature.
A test image is displayed on the screen.
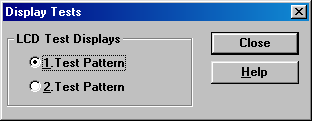
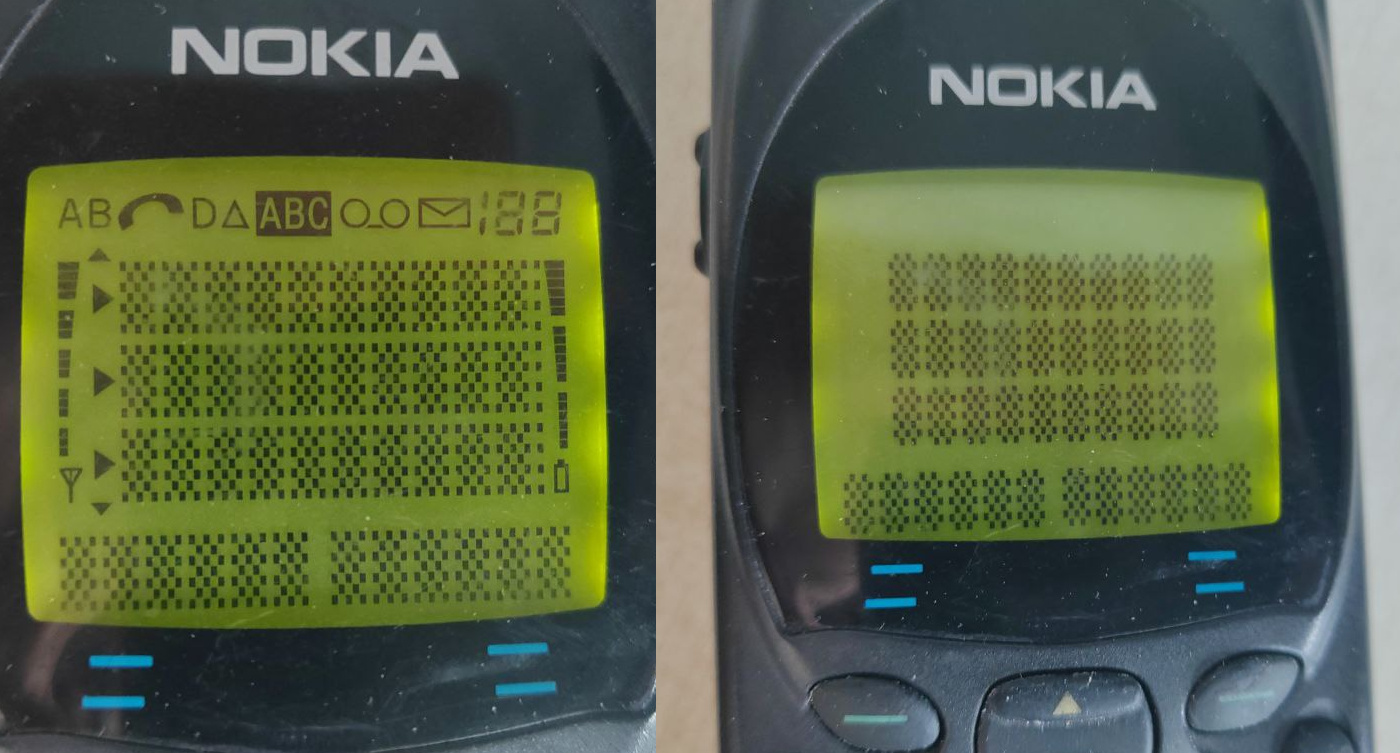
The 2110 doesn't allow you to change the contrast, but you can test the screen by displaying one of two test images.
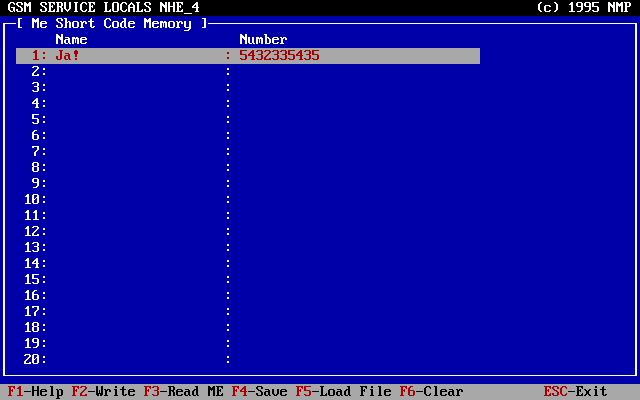
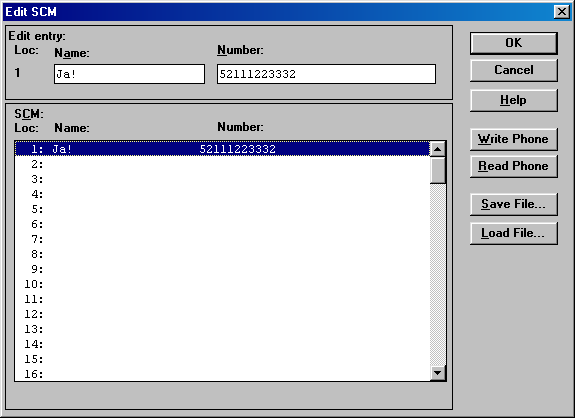
And, of course, the phone book editing function (this doesn’t apply to the 3110 – it doesn’t have its own book, only the SIM card).
Essentially, that's all the basic functionality we can find useful. We can certainly run through the other windows in the testing section, but without knowledge and the necessary equipment, it won't do us any good. Here's what's available for the 2110, for example:


That's pretty much it for unlocking DCT1 and DCT2 phones.
I plan to create a similar article for DCT3 and DCT4 phones, as there are many more of these phones
and I often get requests for help unlocking them.
In the meantime, I hope this guide helps you bring your ancient "brick" back to life!
And Happy New Year 2026 to everyone!
26 December 2025 year, 14:46:53 UTC
Comments
#2
|| Left by: Grain || Date: 16 March 2026 year, 00:20:23 UTC
I've got a 2140 that fails to do any of the dealer options in WinTesla, just says failed to read data from phone. Reason: Wrong response. (same on both 98 and xp)
I'll just end up using the shell to make another system work, just though i'd say.
#1
|| Left by: Maciek || Date: 07 February 2026 year, 14:58:04 UTC
Your article is very good thanks for this. Recently I am struggling with Nokia 9000 RAE-1 , do you know which software is used for this model? Do you have installation pack for wintesla , i need to read lock code as its been changed by previous owner so calculators dont work. I managed to get wintesla working with 2110 and 8110 , works great but i dont have RAE-1 modules files and cant read 9000. Please help.
Переключиться на Русский
Powered by COMPPAG 0.58
2022-2026 © Compys S&N Systems